
What is Gel Electrophoresis?
Gel electrophoresis is a laboratory technique used by researchers to separate DNA fragments using an agarose gel. The agarose gel contains small pores which allow the migration of DNA. During migration, small DNA fragments can pass through the small pores easily, but not for the large one. Hence, small DNA fragment would migrate further than large DNA fragment at the end of gel electrophoresis.
Here are the questions, why the DNA can move in the gel? What causes them to move?
Well, DNA is negatively charged molecules. Each DNA fragments carries the same negative charge per mass, regardless of the size of DNA. As a result, they are attracted by a positive charge when an electric field is applied. (We’ll explain in more details in the gel electrophoresis setup below.)
By using gel electrophoresis technique, you can know how many DNA fragments present in your sample, or the sizes of your DNA fragments. As a result, it is a useful technique to check if your PCR worked, or whether your plasmid contains your gene of interest.
Gel Electrophoresis Set Up
Preparing a TAE buffer solution
TAE buffer is vital in the preparation of gel as it provides the source of ions that are needed during electrophoresis. With these ions, the electric field can be created when connected to the power supply. This helps to separate the DNA with different size.
Preparing a gel with appropriate concentration of gel agarose
You can dissolve the appropriate gel agarose, eg OEM Seakem LE Agarose in TAE buffer. It is usually preparing in weight to volume ratio (weight of agarose: volume of TAE buffer). For example, if you need 1% of agarose gel, simply add 1g of agarose into 100ml of TAE buffer.
Tips: If you are looking for small DNA bands (<500bp), you would need a higher concentration of gel agarose (>1%). Higher concentration of gel agarose help to create a smaller pore size, which increase the separation of small DNA length differences.
During dissolving, you can microwave for 1-3 mins until the agarose is fully dissolved. (Do not overboil it! As the buffer would evaporate and affect the final percentage of agarose in the TAE buffer!)
Then pour the gel into an appropriate gel casting tray with a well comb in place and allow it to set.
Tips: Pour slowly to avoid generation of bubbles. If bubbles is formed during pouring, you can use a pipette tip to push the bubbles away.
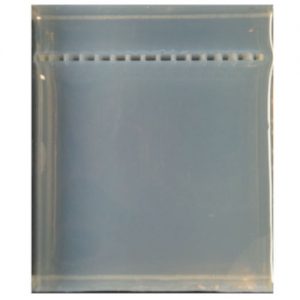
Image of a solidified agarose gel. Each well can be loaded with DNA samples.
Loading DNA Sample into the well
Once the gel is solidified, put agarose gel in the chamber of a gel electrophoresis unit. Fill up the chamber with 1x TAE buffer until the gel is covered.
Before loading your DNA into the well, mix your sample with DNA loading dye.
Why do you need to use a loading dye?
There are two main purposes of using loading dye:
- It has a premixed tracking dye which allows you to see how far your DNA bands have migrated.
- It helps to settle your DNA sample to the bottom of the well, instead of diffusing to the buffer.
Of course, in order to estimate the size of your DNA sample, you need DNA ladder as the reference band. Depends on the size range that you would like to examine, there are several formats of DNA ladder that you can choose. You can refer below:
| DNA Ladder |
DNA Size Range |
| 50bp DNA ladder |
50 – 1350bp |
| 100bp DNA ladder |
100 -1517bp |
| 1kb DNA ladder |
500bp – 10kb |
Usually, the DNA ladder is loaded into the first lane of the gel, while your DNA samples are loaded into the remaining well.
Tips: Before loading your sample into the well, be sure that there is no bubble in your tips. While loading, try to maintain the positive pressure to prevent any bubble or buffer from entering the pipette tips. Push your sample out of the tip slowly to fill the well. Once all sample is loaded, press your pipettor to the second stop and carefully raise the pipette straight out of the buffer. Try to prevent introducing any bubble into the well.
Connect Electrophoresis Chamber with the Power Supply
After loading all samples into the well, connect the electrophoresis chamber with the power supply. Be sure that the connector is in the right place. Black is negative and red is positive. Due to the DNA is negatively charged, the DNA would migrate from negative to positive ends. In other words, the DNA band certainly run to red! So, make sure that the placement of your gel is in the correct direction.
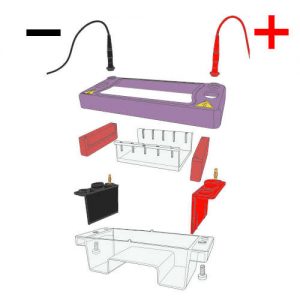
Gel Electrophoresis Setup
Depends on your protocol, run the gel at the voltage range of 80-150V until about 80% way down of your gel. Typical run time is about 45 mins to 1.5 hours, depends on your gel concentration and running voltage.
After completing the gel electrophoresis, you can turn off the power supply and remove the gel from the electrophoresis chamber. You can stain with Ethidium Bromide, or with a more sensitive GelStarTM Nucleic Acid Stain.
Comparison of the sensitivity of GelStar and EtBr
| Type of Nucleic Acid |
Sensitivity of GelStar increase compare to EtBr |
| dsDNA |
4-16 fold |
| ssDNA or SSCP DNA |
20-80 fold |
| Glyoxalated RNA |
16 fold |
| Native RNA |
3-10 fold |
| Formaldehydedenatured RNA |
2-3 fold |
You can choose to add GelStar to stain your agarose prior to casting or to post stain your gels. Please refer to the GelStar Staining protocol for more information.
Viewing of Gel
After staining, you can use any gel documentation system to view your gel. We would recommend using our gelONE Gel Documentation System.
Conclusion
In short, gel electrophoresis is a useful laboratory technique to separate the DNA fragments. After the DNA separation, you are able to determine whether your PCR or cloning was successful.


One thought on “What is Gel Electrophoresis?”